


Bridge Piercing Aftercare: Process, Healing, and Special Considerations July 5, 2021 – Posted in: Piercing Advice, Piercing Types – Tags: bridge piercing, bridge piercing aftercare, bridge piercing and glasses, bridge piercing care, bridge piercing healing, bridge piercing healing time, bridge piercing rejection, can you wear glasses with a bridge piercing, caring for bridge piercing, cleaning a bridge piercing, how to clean a bridge piercing
Bridge piercing aftercare highlights:
- The bridge piercing is a surface piercing that appears on the bridge of the nose between the eyes.
- As it heals, you must clean it 2 – 3 times daily with a piercing aftercare spray.
- While glasses won’t exempt you from this piercing, your anatomy might.
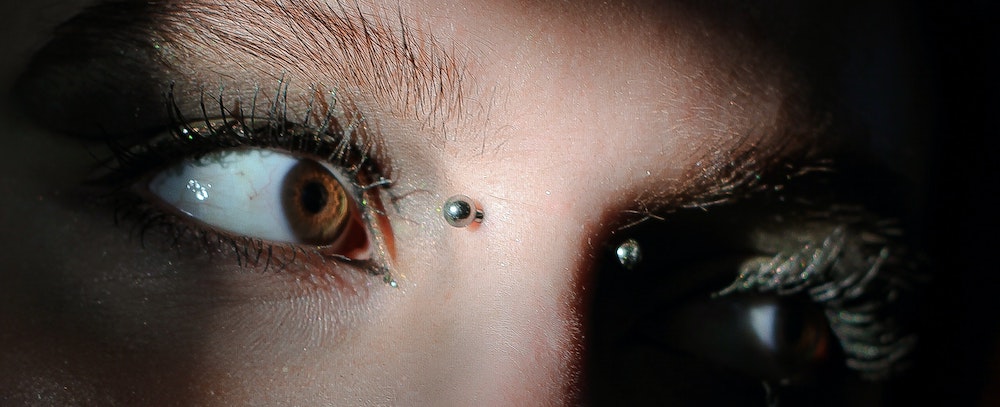
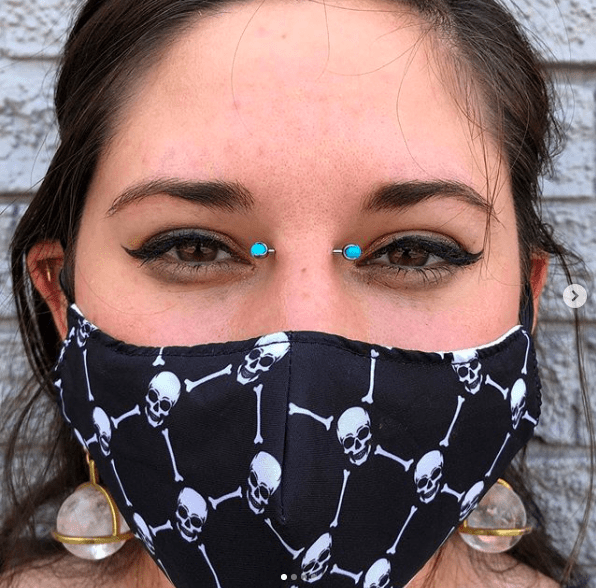
It’s a look that’s exploding in popularity: a seemingly impossible piercing that decorates the bridge of the nose with two bead ends.
It’s easy to assume that this look requires painful and intense body modification in order to achieve it. After all, most mainstream piercings go perpendicularly through the skin and have clear entry and exit points at the front and back of the part that they’ve pierced.
You might be surprised to find out that the bridge piercing is actually quite similar to a navel or eyebrow piercing. Sure, it has unique considerations, but so does every other piercing.
If you’ve ever wondered about what it takes to get a bridge piercing and the aftercare involved, then you’re in the right place. Here’s a brief guide to bridge piercings.
Bridge Piercing Fast Facts
- Healing: 6 – 9 months
- Pain level: Low-to-medium
- Jewelry: Straight barbell
What is a bridge piercing?
A bridge piercing is a surface piercing that appears in the bridge of the nose between the eyes. You’ll see two ball ends decorating either side of the nose, but in reality, it’s one long piercing that’s filled with a straight barbell hidden beneath the skin.
If you pinch the bridge of your nose, you might feel a small fleshy area. (No worries if you don’t; not all people have anatomy suited to the bridge piercing.) This is the area that would be pierced. If you hold that fleshy area between your fingers, you can imagine the placement of the jewelry.
Bridge piercing process
The process to get the bridge piercing will be very similar to any other piercing experience. You’ll first research a reputable piercer if you don’t already have a piercer that you trust. When you arrive at your appointment, the piercer will clean the area and mark where you’ll be pierced. You’ll confirm placement—keeping in mind that placement largely depends upon your anatomy—and you’ll be ready for the procedure.
The piercer will either use clamps to pinch the piercing area or pinch it with their fingers, depending on their preference. Then, they’ll use a sterile, single-use hollow needle to smoothly complete the piercing while subsequently threading the jewelry through. They’ll attach the ball end, and you’ll be done!
Your piercer should guide you through your breathing to help minimize pain. If you’re nervous, let your piercer know, and they’ll do what they can to make the experience as easy as possible.
If you wear glasses, be sure to bring them along to confirm that the bridge piercing won’t get in the way. You can usually wear glasses with the bridge piercing, but it’s a good idea to double-check and make sure that your frames are suited for your new look.

Photo by Alyona Stafeeva
Bridge piercing aftercare
You should clean your new bridge piercing with a piercing aftercare saline solution 2 – 3 times daily. Do this by spraying a cotton swab with the solution, and gently wiping each side. Then, with a new cotton swab, gently dry.
During the healing process, you need to take care of your body, keep your piercing safe from dirt and other debris, and make sure that your piercing remains dry and clean. Your piercer will likely provide you with instructions for aftercare which you must adhere to.
Buy NeilMed Piercing Aftercare here.
Things to watch for during healing
- Jewelry size. Your initial jewelry will be longer to accommodate swelling. Keep an eye on this. If your bridge piercing presses against the ball ends, have your piercer change your jewelry to avoid embedding. After a week or so, when the swelling has gone down, have your piercer fit you with a smaller piece. Larger jewelry poses a snag risk, so flush fit jewelry is your best bet.
- Don’t touch the jewelry as it heals. At first, you might be able to see the bridge jewelry in the corners of your eyes. Don’t worry, your brain will get used to it eventually and adjust, but it might be a bit annoying. It could also make it tempting to touch the jewelry, even unconsciously. Moving the jewelry too much could cause issues like jewelry rejection and scarring, so your jewelry is best left alone.
- Watch for signs of jewelry rejection. If pierced incorrectly, bridge piercings see more rejection than other piercing types. Because of this, it’s a good idea to keep an eye out for signs of rejection as your piercing heals. If the piercing holes get larger, the skin above the barbell gets thinner, or the skin around the piercings starts to get red and flaky, see your piercer for consultation. It could be a sign that your jewelry is getting rejected, and they’ll guide you on the next steps. Unfortunately, it likely spells the end of your piercing. (Jewelry rejection risk is a big reason why you should find a piercer with a long, successful track record when it comes to bridge piercings.)
How long does the bridge piercing take to heal?
Surface piercings, in general, take 6 – 9 months to heal at a minimum.
We’ve said it before, and we’ll say it again: these healing times are minimums only. Before you stop aftercare practices, have a piercer confirm that you’re fully healed. Even if you do everything right, you might take longer to heal, so it’s best to have a professional take a look and confirm that your piercing has healed.
If you’re looking for a facial piercing look that’s a little rarer than something like the eyebrow piercing, then the bridge piercing might be just the thing that you’re looking for. Its location is sure to capture attention, yet it’s still pretty easy to get, even if the healing period is substantial.